  |
产品名称:SMT零件计数器/点料机/SMT计数器产品编号:SMT零件计数器/点料机/SMT计数器 产品型号:SMT零件计数器/点料机/SMT计数器 出品单位:专业零件计数器制造商-易拓(ETOOL) 浏览次数: 更多产品图片: 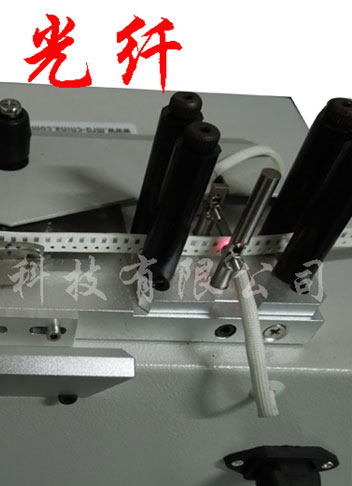

|
||
产品详细介绍: |
|||
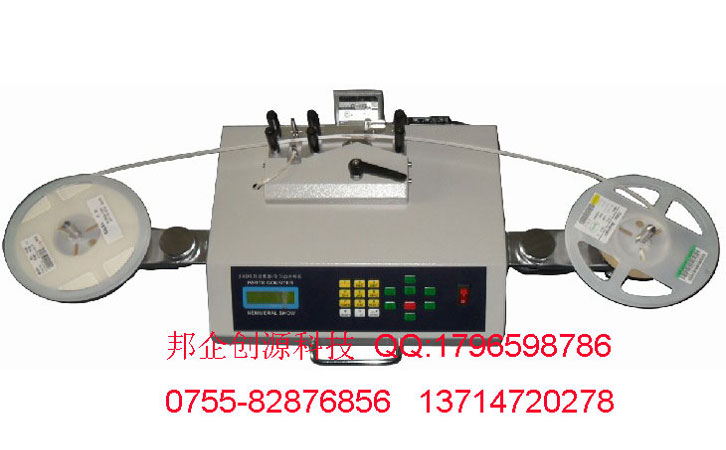
SMT零件计数器/点料机/SMT计数器/SMD点数机/元件计数器/SMD零件计数器
SMT零件计数器/点料机/SMT计数器/SMD点数机/元件计数器/SMD零件计数器 特性;采用光电传感原理,利用零件载带引导孔与零件的对应关系,准确测定SMD零件数量,可实现方便快捷的计数,是 SMT 工厂物料管理的高效辅助设备,尤其对外发加工中的领发料作业有很大的帮助。全自动方式计算零件数量,方便点料,发料作业以及盘点库存,机器速度一至九级可调,调至九级的时候速度是普通零件计数器的二倍。无故障运行. 运行噪音低。 独具匠心的防料带脱落设计。正反向皆可计数,可预设数量,需要多少设置多少,能停在预设的数量上。具有液晶显示器,读取容易,操作面板中英文对照,操作简单。人性化的操作平台设计。精准度高,无计数误差。
目 录 *: 计数器功能,工作环境以及机器规格------------------- 一 *: 计数器薄膜面板功能以及操作说明---------------------- 二 *: 计数器操作方法------------------------------------------ 三 *: 使用注意事项-------------------------------------------- 四 *: 适用范围-------------------------------------------------- 五
一. 功能: 1:本机为全自动电子元件计数器,具有操作方便,精准快速的功能,取代人工计数,提高工作效率。 2:适用于SMT料带式电子元件计数,给工作人员的点料,发料,领料都带来很大的方便。 3:工作人员可根据所需计数的元件数量,料带上两相邻元件的中心间距作适当的设定。 二 工作环境: 电源 (Power) AC220V 50Hz/ AC110V 60Hz 消耗功率:15W 三 主要规格和技术参数 计数范围(Counter Range -99999~99999 噪音等级(Noise rank) < 65分贝 重量(Weight) 10kg 外型尺寸 (Dimension)(mm) (L)450 * (W)270 * (H)220mm
3.1外形结构图
四 薄膜面板功能以及操作说明:
0~9-----数字符号键:每键具有该键上数字功能。 SPEED +------速度增加按纽:按此按纽可以向上调节速度,速度最高为9级。 SPEED - ------速度减小按纽: 按此按纽可以向下调节速度,速度最低为1级。 同时显示屏上有对应的速度显示,SP代表速度,SP下方的数字代表对应的速度。 PITCH↑(间距)----电子元件间距向上调节键:可根据料带上两相邻元件的中心间距来进行设置。 具体设置方法如下:任何SMD盘装料带的下方都有导向孔,并且任何SMD盘装料带的两个相邻的导向孔之间的距离都是4mm,我们的PITCH的数目的单位都是mm,可以设置的数目如下:2,4,8,12,16,20,24,28,32,36,40,44,48,52,56。该数字代表的意义是两个相邻的元件之间的中心距离是多少mm,从元件与导向孔之间的对应关系我们就可以得知该料带的PITCH数字应该设置为多少。比如一般0805的电阻:一个元件的下方对应一个导向孔,因为导向孔与孔之间的距离是4mm,所以两个0805的电阻中心间距也是4mm,这时PITCH数目应该设置成4,如果一个元件的下方对应2个导向孔,则PITCH应该设置成8,同样的道理,如果一个导向孔的上方对应有两个元件(如0402的电阻),则PITCH应该设置成2,依次类推可以得知其它间距的设置原理。 PITCH↓(间距)----电子元件间距向下调节键。 CLEAR(清零)------删除键:删除液晶显示屏当前所显示的数据。(注:在AUTO状态下,所删除的是COUNT下的数字,在MANL状态下删除的是SET下的数字)。 LOSS(测漏)-----漏件设置键(测漏型)。 MANL/AUTO(手动/自动)------MANL为设定元件数量方式,AUTO为计数元件总数方式。 TIME(时间)-------时间设置键:按此键进入时间设置状态后可依次输入年份,月份,日期,小时,分钟(年份为四码,其余为二码),输入后需按一次确认键才有效。 REWINDING(反转)-----马达反转键:按此键马达反向转动。 STOP(停止)---------停止键:按此键停止计数器。 START(正转)---------马达正转键,按此键马达正向转动。 五 操作方法: 1:计数器连接AC220V的电源后,液晶显示屏会显示COUNT,PITCH,SET等数据。 2:根据所要计数的料带两相邻电子元件的中心间距选择好PITCH的参数。 3:将要计数的电子元件料盘安装在左侧的料盘支架上,同时将空料盘固定在右侧的料盘支架上。 4:使料带从导轮下方通过并使料带输送孔与计数器齿轮密合,将料带第一颗元件前端的部分固定在空料盘上(一般料带前端10~30CM没装元件)然后让第一个元件前沿分隔栓对准计数器红色箭头中央线并按删除键使液晶显示屏数字归零,然后开始计数,计数分为自动方式(ATUO)和手动方式(MANL)。 5: a.若在AUTO(自动)状态下(此时显示屏上SET下方没有数据)即可按“START” 键开始计数。 b.计数完毕可按“PRINTER”键,将由条码打印机打印出正确的元件数量以及所设置的字符或日期。 6: a.若在MANL(手动)状态下计数(此时显示屏SET下方会显示00000状态)请设定需计数的元件数量。 b.然后重复第4个步骤的动作。 c.按“START”键开始计数,当元件数量超过所设置的计数数量时,机器会停止(但由于马达的惯性,料盘将在马达刹车稍许后停止)。 d.若因惯性而使元件数量超过时,可以手动将左侧料盘逆时钟旋转到所需的数量为止。 六 使用注意事项: 1:不要将机器放在潮湿,高温的地方,要保持机器表面清洁。 2:搬拿机器要小心,机器工作处要平稳,干净。 3:装料带时,工作人员应将料带输送孔对准计数器齿轮,以免计数器工作时伤及料带,同时要检查料带是否已固定好。 4:使用机器时,工作人员须以手动方式判断料带上的元件是否计数到最后一颗,若计数到最后一颗时请按“STOP”键停止计数,但由于惯性料带会随马达的转动而右移少许,此时,应将料带向左拉到最后一颗元件,显示屏所显示的COUNT数即为料带计数元件的总数,工作人员可按“PRINTER”键将此数量打印出来。如要料带返回左盘,可按“REWINDING”。 5:在MANL状态下计数,机器每计数完成所设定数量时都会自动停止工作,再计数时最后的总数量是叠加的。 6:工作人员若在计数过程中按“STOP”键,显示屏将会显示停止之前所计数的元件的数量,此时,只需按“START”键,计数器便会继续工作或按“REWINDING”键将料带返回。 7:在计数过程中,若右边料带松动,将会使马达停止转动。此时,工作人员应先按“STOP”键停止工作,将其固定好,然后按“START”键使计数器继续工作。 8:机器工作时务必要消除静电,即给FG孔安上接地装置。 9:机器不工作时要及时将电源关掉。 10:计数完毕后,按下电源开关关闭机器电源。 七 本机适用范围: 料带式贴片类电子元件(电阻,电容,IC等) 料带宽度:65(MAX) 料盘直径:400(MAX) 料带元件间距2,4,8,12,16,20,24,28,32,36,40,44,48,52,56单位均为毫米。 SMD parts counter instruction
Catalog 1. Function of counter, work environment and specification…(one) 2. Function and operate instruction of the film panel……………(two) 3. Operate method of the counter……………………………………(three) 4. Matter needing attention for using…………………………………(four) 5. Applied extension…………………………………………………………(five) Function: 1. Full-automatic electronic device counter with convenient, accurate and quick function which have promote heavily work efficiency and work equality based on artificial counter. 2. Adapting to ... provide workers with ... 3. Workers could set the distance between centers of two neighbor device according to mounts of devices to be counted. 4. The numbers of electronic devices date and company name (only English) could be printed out for next use. * Work Environment Work source: AC110V~220V50HZ Power: about 15W Numbers could be Counted: 1~100000 units *Counter Specification Shape Dimension: (L)450 * (W)270 * (H)220mm Weight: 10Kg *Film Panel Function and Operating Instruction €~‰-----character key: each key has not only the function of the number on it but also has the function of all characters under the number. SPEED + ----- speed add key , This model do not have this feature SPEED - ----- speed sub key , This model do not have this feature PITCH-----pitch setting key: you can set the distance between two adjoining components on the CLEAR-----delete key: delete the data on the current LCD screen. (notice: if under AUTO condition, number below COUNT will be deleted, if under MANL condition, number below SET will be deleted.) LOSS----- setting key (counter model) MANL/AUTO----- MANL is the way of setting the number of components; AUTO is the way of counting the total number of components. TIME-----time setting key: press it to enter into a state of time setting, then you can input year, month, day, hour, minute in turn. This input will be activated after pressing the ENTER key. REWINDING-----motor rewinding key: the motor will redwing by pressing it. STOP-----stop key: press it to stop counting. START-----motor winding key: the motor will wind by pressing it. *Operating Method
Once counting is completed, you can press PRINTER key, code printer will print out the correct…
Repeat the 4th step To start counting by pressing START key, when counting number exceeds the setting number, counter will stop (but because of inertia …will stop after the motor stops). If because of inertia the number of components exceeds, you can manually rotate …counter cockily to needed number. Notice
Applied extension Resistance capacitance, IC and so on Width: 56(MAX) Diameter 400(MAX) Space between….: 2,4,8,12,16,20,24,28,32,36,40,44,48,52,56 |
|||
 |
 |
 |
 |